CONGRATULATIONS ON YOUR BRAND NEW
ART DECO 3 IN 1 CONVERTIBLE CRIB
LET’S ASSEMBLE!
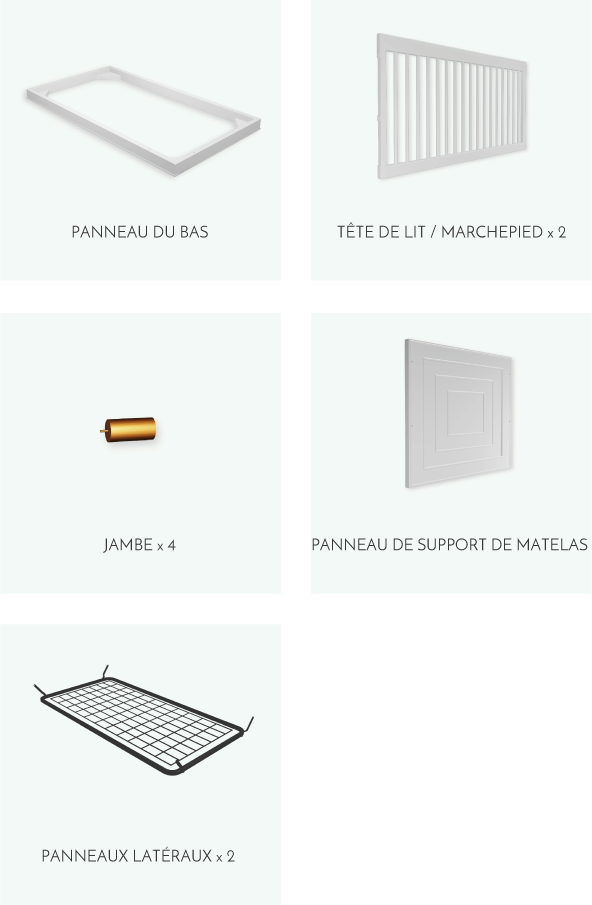
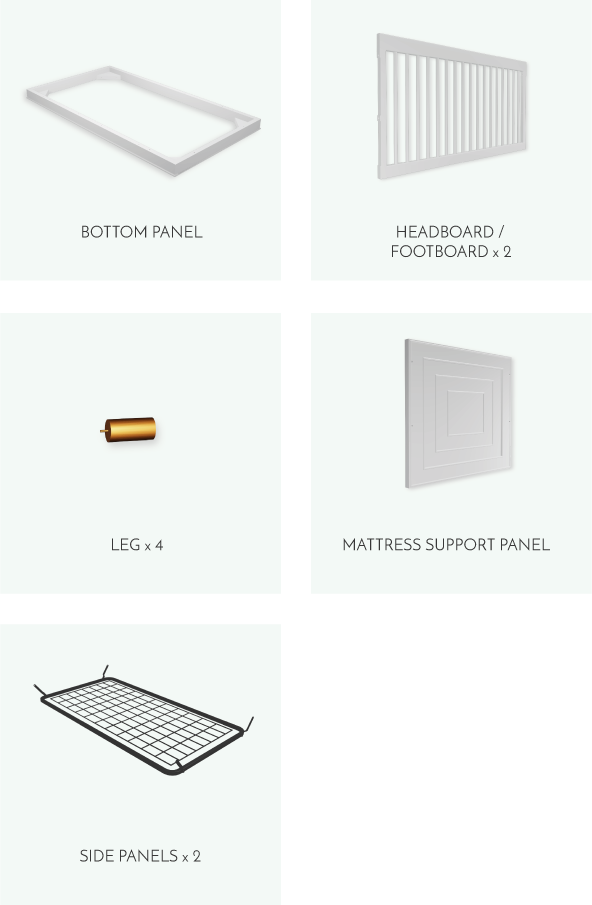
PARTS
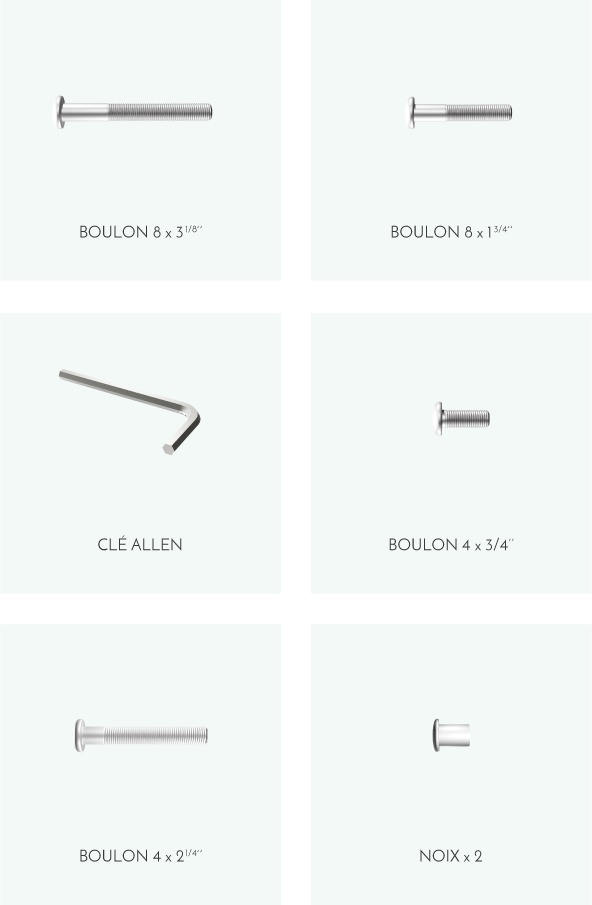
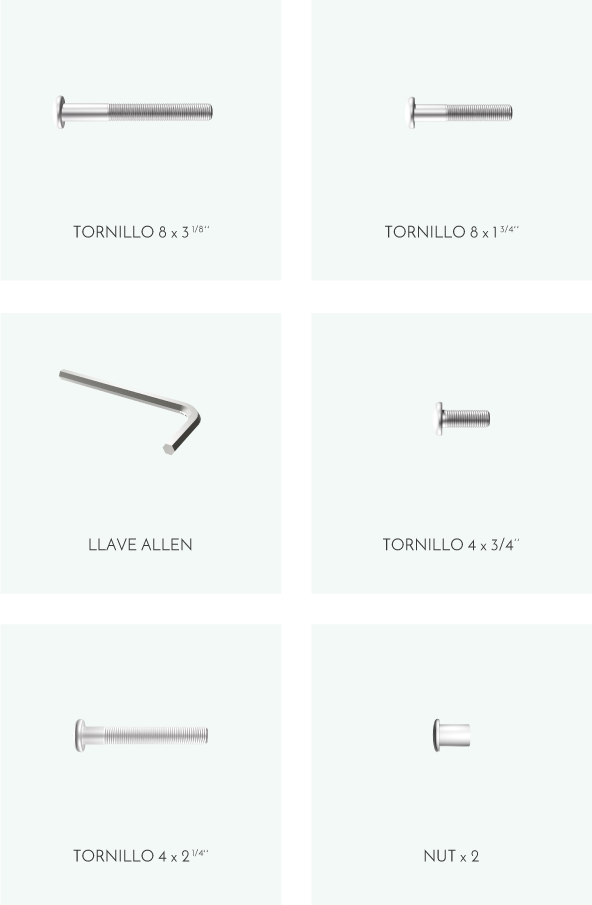
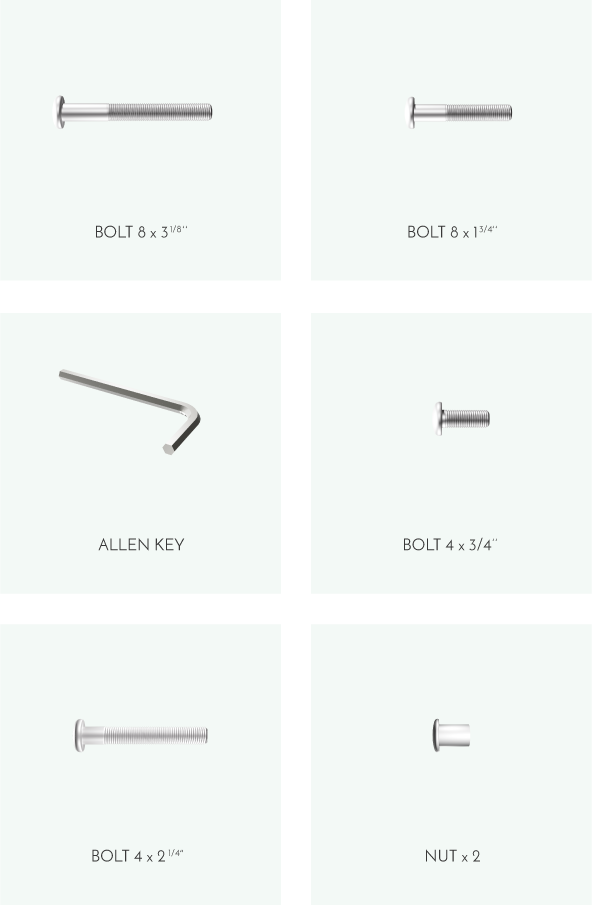
HARDWARE
ASSEMBLY
(1A) Hold the leg (2) in your hand and locate the corresponding holes on the bottom panel (1) where the leg will be attached.
(1B) Insert the leg into the hole, aligning it properly. Make sure it fits snugly but not too tight at this point.
(1C) Continue tightening until the leg feels stable and doesn't wobble. Stop once you feel resistance or when the leg is firmly in place. Avoid over-tightening to prevent damaging the product.
(1D) Repeat the process for the other legs. Check the stability of the product by gently shaking it or applying light pressure to see if it feels sturdy and the legs are firmly in place.
(2A) Position the side panel (3) so that it aligns with the bottom panel (1). Gently lower it into place, ensuring that the edges of the two panels match up correctly.
(2B) Insert the screw (A) into the pre-drilled hole on the side panel, aligning it with the corresponding hole on the bottom panel.
(2C) Begin tightening screw (A) by hand, turning it clockwise until it is snug but not fully tightened. This initial hand tightening will help hold the panels together securely.
(2D) Insert the allen key (C) into the screw head and turn it clockwise to further tighten the screw. Apply firm but controlled force to ensure the panels are securely fastened.
(2E) Repeat the entire process for the other side panel ensuring that it aligns properly with the bottom panel.
(3A) Place the footboard (3) in position, aligning it with the designated area on the bottom panel (1). Gently lower it into place, ensuring that the edges and screw holes of both components match up correctly.
(3B) Insert the screw (B) into the pre-drilled hole on the footboard, aligning it with the corresponding hole on the bottom panel and begin tightening screw (B) by hand, turning it clockwise until it is snug but not fully tightened.
(3C) Insert the allen key (C) into the screw head and turn it clockwise to further tighten the screw. Repeat the process for all sides.
(3D) Insert screw (A) into the pre-drilled hole on the footboard, aligning it with the corresponding slot at the bottom of the bottom panel (1).
(3E) Once screw A is hand-tightened, insert the allen key (C) into the screw head and turn it clockwise to further tighten the screw.
(4A) Gently lower the mattress support panel (5) into the designated slots on the sides of the crib.
(4B) The holes on the top slot are for infants, the middle holes for babies that can sit up straight, and the bottom holes for toddlers. Choose the appropriate hole based on your requirement.
(4C) Align the mattress support panel with the chosen hole and ensure that the panel rests securely on the corresponding slots. Insert the screw (D) into the pre-drilled hole on the crib frame, aligning it with the hole on the mattress support panel (5) and tighten it by hand.
(4D) Once screw (D) is hand-tightened, insert the allen key (C) into the screw head and turn it clockwise to further tighten the screw. Apply moderate force, ensuring a secure attachment, but avoid over-tightening to prevent damaging the product.
(4E) Repeat the entire process for the other side.
(5A) Place the headboard (3) in position, aligning it with the designated area on the bottom panel (1). Gently lower it into place, ensuring that the edges and screw holes of both components match up correctly.
(5B) Insert the screw (B) into the pre-drilled hole on the headboard, aligning it with the corresponding hole on the bottom panel and begin tightening screw (B) by hand, turning it clockwise until it is snug but not fully tightened.
(5C) Insert the allen key (C) into the screw head and turn it clockwise to further tighten the screw. Repeat the process for all sides.
(5D) Insert screw (A) into the pre-drilled hole on the headboard, aligning it with the corresponding slot at the bottom of the bottom panel (1).
(5E) Once screw (A) is hand-tightened, insert the allen key (C) into the screw head and turn it clockwise to further tighten the screw.
CONVERSION MODES
(1A) Ensure that the mattress support panel is in the lowest position. Adjust it accordingly if needed.
(1B) Undo the screws on the bottom and side of the front rail (4) carefully. This will allow you to detach the front rail from the bottom panel (2) of the crib.
(1C) With the front rail removed, take screw (E) and insert it from the bottom of the crib. Align it with the corresponding hole or slot on the mattress support panel.
(1D) Begin tightening screw (E) by hand, turning it clockwise until it is snug but not fully tightened.
(1E) From the top of the crib, secure screw (E) in place by using nut (F). Insert nut (F) onto the threaded end of screw (E) and tighten it securely using the allen key (C). This will ensure that the mattress support panel remains in position.
(1F) Set the front rail aside in a safe place, as it may be needed for future conversions or when reassembling the crib.
NOTE: When converting the crib into a day bed, it is important to use a guard rail that is specifically manufactured for your crib model by Évolur Inc. It is crucial to follow the manufacturer's instructions and recommendations for the proper use of the guard rail.
(2A) Ensure that the mattress support panel is in the lowest position. Adjust it accordingly if needed.
(2B) Undo the screws on the bottom and side of the front rail (4) carefully. This will allow you to detach the front rail from the bottom panel (2) of the crib.
(2C) Please follow the complete instructions that come with the guard rail to ensure safe and secure assembly. (Sold Separately)
SAFETY SLEEP TIPS
Adult Assembly Required.
Small parts may present choking hazard prior to assembly.
DO NOT use the product if it is damaged, broken, and/or components are missing or broken.
Please read the instructions thoroughly. Identify all parts & hardware.
Do Not Use Power Drills or Drivers.
For a Safe and comfortable Sleep experience, we suggest using Dream On Me Greenguard Gold Certified Full-Size Mattresses.
Explore!To protect your parts during assembly, please place them on a soft surface.
To clean surface, use only water on a damp cloth. Do not use window cleaner or cleaning abrasive as it will scratch the surface and could damage the protective coating.
CLICK ON THE ICONS TO KNOW MORE

WARNINGS
-
FAILURE TO FOLLOW THESE WARNINGS AND ASSEMBLY INSTRUCTIONS COULD RESULT IN SERIOUS INJURY OR DEATH:
- TO REDUCE THE RISK OF SIDS(SUDDEN INFANT DEATH SYNDROME), PEDIATRICIANS RECOMMEND HEALTHY INFANTS BE PLACED ON THEIR BACKS TO SLEEP, UNLESS OTHERWISE ADVISED BY YOUR PHYSICIAN.
- CHECK THIS PRODUCT FOR DAMAGED HARDWARE, LOOSE JOINTS, MISSING PARTS OR SHARP EDGES BEFORE AND AFTER ASSEMBLY AND FREQUENTLY DURING USE.
- DO NOT USE THIS CRIB IF ANY PARTS ARE MISSING, DAMAGED OR BROKEN. CONTACT DREAM ON ME - 45 VERONICA AVENUE SOMERSET NEW JERSEY 08873 FOR REPLACEMENT PARTS.
- DO NOT USE A WATER MATTRESS WITH THIS CRIB.
- IF REFINISHING, USE A NON-TOXIC FINISH SPECIFIED FOR CHILDREN’S PRODUCTS.
-
STRANGULATION HAZARD:
- STRINGS CAUSE STRANGULATION! DO NOT PLACE ITEMS WITH A STRING AROUND A CHILD’S NECK, SUCH AS HOOD STRINGS OR PACIFIER CORDS. DO NOT SUSPEND STRINGS OVER A CRIB OR ATTACH STRINGS TO TOYS.
- TO HELP PREVENT STRANGULATION TIGHTEN ALL FASTENERS. A CHILD CAN TRAP PARTS OF BODY OR CLOTHING ON LOOSE FASTENERS.
- DO NOT PLACE CRIB NEAR WINDOW WHERE CORDS FROM BLINDS OR DRAPES MAY STRANGLE A CHILD.
- INFANTS CAN SUFFOCATE ON SOFT BEDDING.
- NEVER ADD A PILLOW, COMFORTER OR PADDING.
- NEVER PLACE ADDITIONAL PADDING UNDER INFANT.
- NEVER USE PLASTIC SHIPPING BAGS OR ANY PLASTIC FILM AS MATTRESS COVERS, BECAUSE THEY CAN CAUSE SUFFOCATION.
- INFANTS CAN SUFFOCATE IN GAPS BETWEEN CRIB SIDES AND A MATTRESS THAT IS TOO SMALL. ANY MATTRESS USED IN THIS CRIB MUST BE AT LEAST 27-1/4 IN (69 CM) BY 51-5/8 IN (131 CM), WITH A THICKNESS NOT EXCEEDING 6 IN (15CM) AND A MINIMUM THICKNESS OF 4 IN (10 CM). THE DIMENSIONS OF THE MATTRESS SHALL BE TAKEN FROM SEAM TO SEAM OR EDGE TO EDGE WHERE APPROPRIATE.
-
FALL HAZARD:
- WHEN CHILD IS ABLE TO PULL TO STANDING POSITION, SET MATTRESS TO LOWEST POSITION AND REMOVE BUMPER PADS, LARGE TOYS AND OTHER OBJECTS THAT COULD SERVE AS STEPS FOR CLIMBING OUT. AFTER RAISING SIDE, MAKE SURE LATCHES ARE SECURE (DISREGARD FOR NON-DROP SIDE CRIB).
- DO NOT LEAVE CHILD IN CRIB WITH SIDES LOWERED. BE SURE SIDE IS IN RAISED AND LOCKED POSITION WHENEVER CHILD IS IN CRIB (DISREGARD FOR NON-DROP SIDE CRIB).
- STOP USING CRIB WHEN CHILD BEGINS TO CLIMB OUT OR REACHES THE HEIGHT OF 35 IN (89 CM).
- WHEN STORING CRIB USE CAUTION AS EXTREME CHANGES IN TEMPERATURE OR HUMIDITY CAN COMPROMISE THE CRIB MAKING IT EXTREMELY DANGEROUS TO YOUR CHILD.
- USE CAUTION WHEN A VAPORIZER OR HUMIDIFIER IS IN USE. ALWAYS AIM VAPOR AWAY FROM THE CRIB AS WELL AS ANY OTHER WOODEN FURNITURE. PROLONGED PERIODS OF HUMIDITY IN STORAGE AS WELL AS IN THE HOME CAN COMPROMISE THE CRIB.
- AVOID USING VAPORIZERS AND HUMIDIFIERS FOR PROLONGED PERIODS OF TIME.
- FOLLOW WARNINGS ON ALL PRODUCTS IN CRIB.
- DO NOT USE THIS CRIB IF YOU CANNOT EXACTLY FOLLOW THE ACCOMPANYING INSTRUCTIONS.
- DO NOT USE THIS CRIB FOR A CHILD WHO CAN CLIMB OUT OF IT OR WHO IS TALLER THAN 90 CM.
- DO NOT PLACE IN OR NEAR THIS CRIB ANY CORD, STRAP OR SIMILAR ITEM THAT COULD BECOME WRAPPED AROUND A CHILD’S NECK.
- DO NOT PLACE THIS CRIB NEAR A WINDOW OR A PATIO DOOR WHERE THE CHILD COULD REACH THE CORD OF A BLIND OR CURTAIN AND BE STRANGLED.
- CHECK THIS CRIB REGULARLY BEFORE USING IT AND DO NOT USE IT IF ANY PARTS ARE LOOSE OR MISSING OR IF THERE ARE ANY SIGNS OF DAMAGE. DO NOT SUBSTITUTE PARTS. CONTACT THE MANUFACTURER IF REPLACEMENT PARTS OR ADDITIONAL INSTRUCTIONS ARE NEEDED.
- USE A CRIB MATTRESS THAT IS NO THICKER THAN 15 CM AND IS OF SUCH A SIZE THAT, WHEN IT IS PUSHED FIRMLY AGAINST ANY SIDE OF CRIB, IT DOES NOT LEAVE A GAP OF MORE THAN 3 CM BETWEEN THE MATTRESS AND ANY PART OF THE SIDES OF THE CRIB.
- CHILDREN CAN SUFFOCATE ON SOFT BEDDING. DO NOT PLACE PILLOWS, COMFORTERS OR SOFT MATTRESS IN THIS CRIB.
FURNITURE CARE
-
ROOM CLIMATE CONTROL:
- Wood, when first cut contains more than 50 percent water. When it is prepared for furniture construction it is placed in a Kiln and the moisture content is brought down to 8 to 10 percent. Wood is porous and responds to its environment. If the room has high humidity it will absorb it and expand and if the humidity is low it will lose moisture and shrink.
- It is important that the humidity levels in the room be controlled from extremes of too much humidity or too little. Furniture should not be placed close to the air-conditioning outlets, fire places, radiators, space heaters, humidifiers or dehumidifiers. Exposure to extreme variations of temperature and humidity can damage any fine wood product.
-
THE IDEAL ENVIRONMENT FOR FINE FURNITURE:
- Fine wood furniture will have fewer problems when its environment is controlled at a temperature between 65 and 75 degrees and a relative humidity between 35 and 40 percent. Wood placed in an environment outside of those limits can and will shrink or expand and may develop some small cracks which are not material or structural defects.
-
STICKING DOORS AND DRAWERS:
- With the minor changes in temperature and humidity, doors and drawers may swell and be difficult to open or close. Tolerances have been built into the units but extreme conditions may still cause sticking. This will adjust back to normal over time but until it does consider using a dehumidifier or rub candle wax or paraffin on sides that stick.
-
AVOID DIRECT SUNLIGHT:
- With the minor changes in temperature and humidity, doors and drawers may swell and be difficult to open or close. Tolerances have been built into the units but extreme conditions may still cause sticking. This will adjust back to normal over time but until it does consider using a dehumidifier or rub candle wax or paraffin on sides that stick.
-
PROPER STORAGE:
- If you need to put your furniture in storage for any period of time do not store them in a damp basement or hot dry attic. Allow air movement around the furniture and do not stack anything on it.
-
IN GENERAL:
- Protect furniture surface from hot or extremely cold items.
- Use coasters under hot or cold beverages.
- Do not use synthetic fabric under accessories or lamps.
- Protect tops from pens, markers and crayons.
- Oils from potpourri and other scented items can damage the finish of the furniture.
- Do not drag items across the surface of the furniture.
- Allow the surface to breath by rotating your accessories and lamps.
- Do not over polish the furniture, do it only two or three times a year. Over polishing can distort the natural finish of the product.
- Do not wax the furniture, as wax build up can destroy natural finish of the product.
- When moving furniture always lift the unit. Do not push or drag it to avoid damage to legs.
- Keep the furniture level so doors and drawers open and close freely.
- Clean with a damp, not wet, cloth. Use only a mild soap. Do not use the abrasive cleaners.
- Do not scratch or chip the finish.
- Inspect the product periodically, contact Dream On Me for replacement parts or questions.
- Do not store the product or any parts in extreme temperatures and conditions such as a hot attic or a damp, cold basement. These extremes can cause a loss of structural integrity.
- To preserve the luster of the high-quality finish on your product, it is recommended to place a doily or felt pad under any items you place on the finish.
- Clean with a damp cloth, then a dry cloth to preserve the original luster and beauty of this fine finish.
- Do not use abrasive chemicals.
- Do not spray cleaners directly onto furniture.
- Lift slightly when moving on carpeting to prevent leg breakage.
- Use of a vaporizer near furniture will cause wood to swell and to peel.
COMPLETE YOUR DREAM NURSERY!